


2,703 ratings, average 4.99 stars. Boiling eggs in the Thermomix® is the most-tested basic recipe on will-mixen.de. 500 g water, eggs in the steamer basket, Varoma, speed 1. The cooking time is what matters: 12 minutes for soft, 15 for hard. One minute makes the difference between a runny and a set yolk.
We have been boiling eggs in the Thermomix® several times a week for years and have tested both methods hundreds of times: the steamer basket for up to 8 eggs, the Varoma for up to 20. The cooking time depends on the size, temperature and age of the eggs. Anyone who ignores the difference between size M and L will end up with either too-soft or too-firm yolks.
Boiling Eggs in the Thermomix®

Ingredients 0 / 2 ✓
- 500 g water
- 8 egg size M
Instructions 0 / 3
-
1
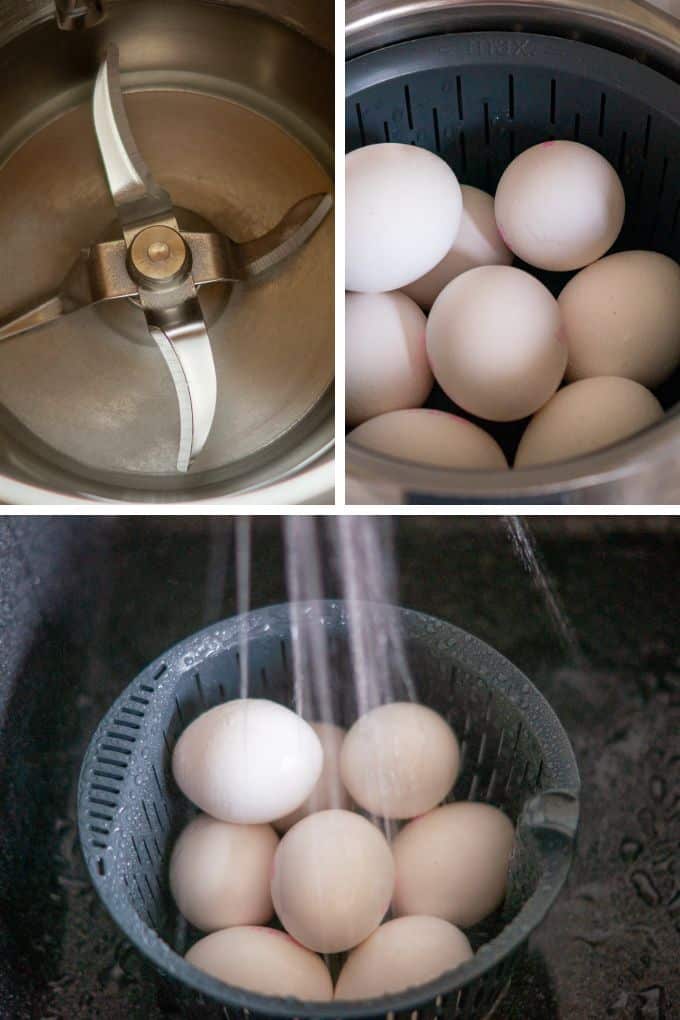
Water.
Add water to the mixing bowl.
-
2
Cook the eggs.
Place the eggs in the steamer basket, insert the steamer basket into the mixing bowl and cook for 12 min / Varoma / speed 1.
-
3
Refresh.
Remove the steamer basket with the help of the spatula and immediately refresh the eggs under ice-cold water.
This recipe is for very soft-boiled eggs. Increase the cooking time according to the table "Boiling Eggs in the Thermomix® Steamer Basket"
Video
Nutrition per serving
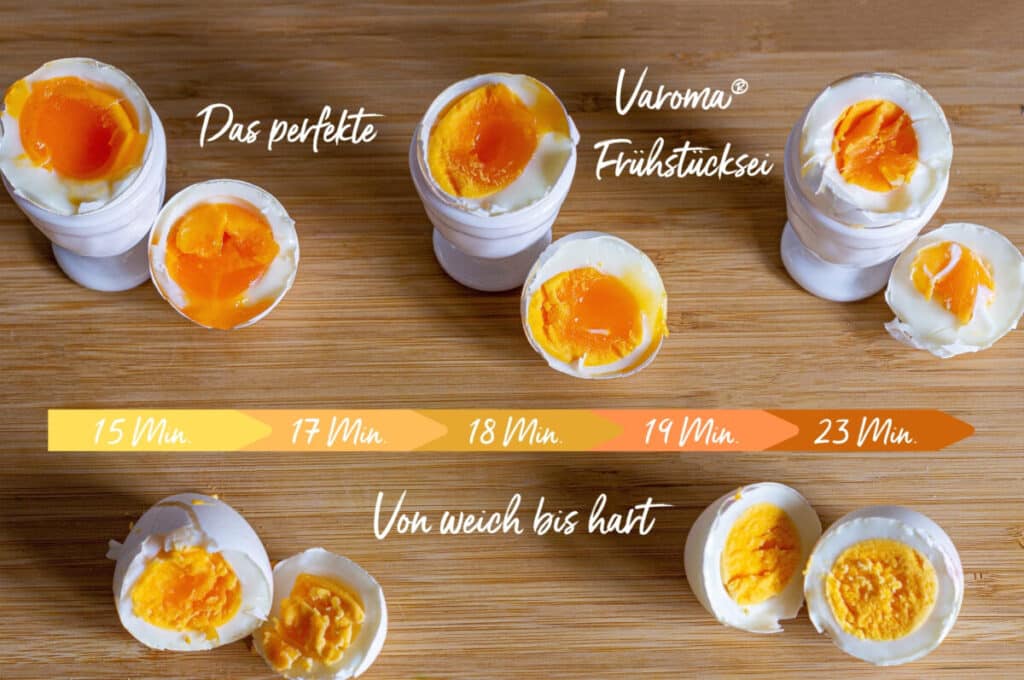
Cooking time table: how long do eggs need to cook in the Thermomix®?
The cooking time depends on the desired doneness and the egg size. Size M is 53 to 63 g per egg, size L is 63 to 73 g (EU Regulation 589/2008). The larger yolk in a size L egg needs roughly one minute more to reach the same doneness.
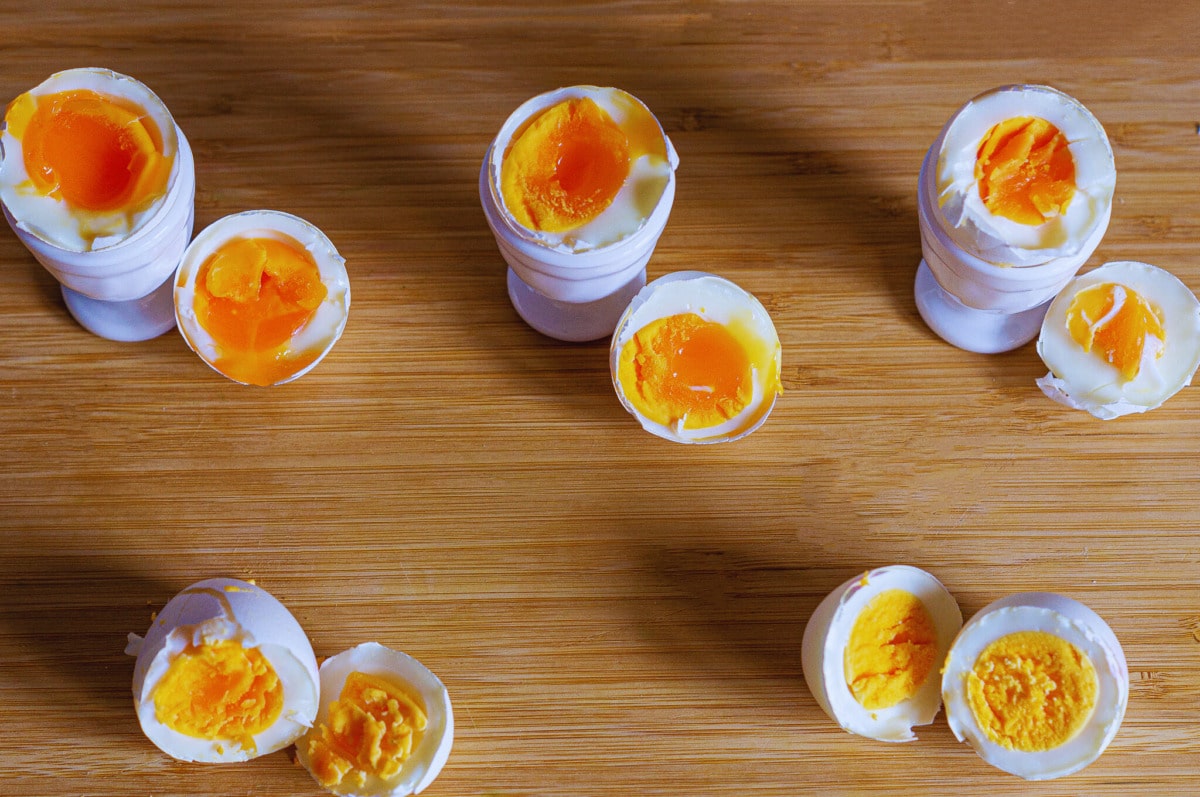
All times apply to room-temperature eggs. If the eggs come straight from the fridge, add half a minute. The table is based on our main method: 500 g water in the mixing bowl, eggs in the steamer basket, Varoma temperature, speed 1.
Steamer basket or Varoma: which method for how many eggs?
The steamer basket holds a maximum of 8 eggs. This method works on all Thermomix® models (TM7, TM6®, TM5®, TM31) and is ideal for everyday use. Add 500 g water to the mixing bowl, place the eggs in the steamer basket, insert the basket, then cook for 12 to 16 minutes at Varoma and speed 1 depending on the desired doneness.
For larger quantities we use the Varoma. Up to 20 eggs fit in the Varoma bowl. The steam circulation is more even than stacking multiple baskets. Add 500 g water to the mixing bowl, place the eggs in the Varoma bowl, set the Varoma on top, then cook for 17 minutes at Varoma and speed 1 for soft-boiled eggs. For hard-boiled eggs, increase the time to 23 minutes.
The Varoma reaches a steam temperature of around 120 °C. The longer cooking time is due to the indirect heat: the steamer basket sits directly above the water, the Varoma above that. For Easter or meal prep, the Varoma method is the better choice because 20 eggs are ready at once.
TM6®, TM7 and TM5®: differences between models
The steamer basket and Varoma methods work identically on all models. The TM6® and TM7 also offer an automatic egg mode using the egg holder accessory. This holder fits a maximum of 6 eggs. Select the desired doneness (soft, medium, hard) and the Thermomix® calculates the time automatically.
The advantage: no manual time setting. The disadvantage: fewer eggs than in the steamer basket, requires an extra accessory, and does not work on the TM5® or TM31. For 8 or more eggs, or for older models, the manual steamer basket method is the better option. The speed setting stays the same across all methods: always speed 1.
Parallel cooking: eggs in the Varoma, potatoes in the mixing bowl
The biggest advantage of the Varoma method is being able to cook something else in the mixing bowl at the same time. Cook potatoes, rice or broccoli in the mixing bowl while the eggs steam above in the Varoma. The steam still reaches the eggs. The only condition: the dish in the mixing bowl must also run at Varoma and speed 1. The cooking time is governed by whichever dish takes longer.
Example: cooking potatoes (20 minutes in the mixing bowl) and eggs in the Varoma (17 minutes for soft-boiled). Add the eggs to the Varoma 3 minutes after starting, so both finish at the same time. Or let the eggs run the full 20 minutes and get hard-boiled eggs.
Why are some eggs hard to peel?
Fresh eggs (under 7 days old) are difficult to peel. The white sticks to the inner shell. The reason: the pH of a fresh egg is around 7.6. After 10 days it rises to around 9.2. A higher pH loosens the membrane between the white and the shell.
Our solution: store eggs for 10 to 14 days before boiling. Refreshing in cold water helps with peeling, but cannot fully overcome the stickiness of very fresh eggs. For Easter or meal prep, buy the eggs deliberately 2 weeks in advance.
Refreshing in cold water: when it is necessary and when it is not
Refreshing stops the carry-over cooking only for soft and soft-to-medium eggs (12 to 14 minutes cooking time). At that stage the yolk is still runny or creamy. Without refreshing, the egg continues to cook from the residual heat and the yolk becomes firmer than intended.
For hard-boiled eggs (15 to 17 minutes) the yolk is already fully cooked through. Refreshing then only helps with peeling, because the shell loosens more easily from the thermal shock. We refresh all eggs because it makes peeling easier.
Pricking, vinegar, fridge: what actually works?
Pricking: Only worth doing with very fresh eggs (under 5 days old). The air pocket is still small, the pressure during cooking is higher and the shell is more likely to crack. With older eggs (10 days and over) pricking makes no difference, the air pocket is large enough.
Vinegar in the water: Does not improve peeling. But if an egg cracks, the vinegar causes the white to coagulate faster so it does not run out. A tablespoon per 500 g water does no harm.
Straight from the fridge: Cold eggs need half to one minute longer and peel less easily because the white clings more firmly to the shell. Better: take eggs out 30 minutes before cooking.
Directly in the mixing bowl without the steamer basket: not a good idea
Cooking eggs directly in the mixing bowl (without the steamer basket) does not work well. The eggs roll around on the base, knock against the blade and the shells crack. The steamer basket is essential: it keeps the eggs in place and above the water.
Avoiding the green ring around the yolk
The grey-green ring around the yolk of hard-boiled eggs is caused by a reaction between iron in the yolk and sulphur in the white when the cooking time is too long. It is harmless but looks unappetising. The solution: do not cook for longer than 16 minutes in the steamer basket (size M) and refresh immediately after cooking. The ring starts to form after around 18 minutes of cooking.
Easter eggs and meal prep: large batches at once
For Easter or weekly meal prep, the Varoma method is ideal: up to 20 eggs at once. Cook hard (23 minutes in the Varoma), refresh, then store in the fridge. Hard-boiled eggs with their shells intact keep for 7 to 10 days. Store in a sealed container so they do not absorb other smells. Eat soft-boiled eggs within 2 to 3 days.
Always dye Easter eggs after cooking, not during. Dye does not penetrate the shell, it only deposits on the outside. Cook the eggs as normal, refresh them, then place them in the dye bath.
What we do differently from other Thermomix® sites
We looked at the major Thermomix® recipe sites. Some give 16 minutes for hard-boiled eggs in the steamer basket, others only 14 minutes, both without distinguishing between size M and L. In our experience, that is the main reason for inconsistent results. A size L egg weighs up to 73 g, a size M egg only 53 g. Using the same timer, size L will still have a runny centre where size M is already fully cooked.
Goes well with: Radishes and mustard eggs.
Our tip: grinding corn in the Thermomix®.
That is why we have separated the cooking time by size: 15 minutes for hard at M, 16 minutes at L. For very hard, 16 and 17 minutes respectively. In the Varoma we recommend 23 minutes for hard, plus one additional minute for L. The second difference: we consistently refresh in genuine ice water, not just under the tap. The faster temperature drop releases the membrane more reliably and prevents the green ring.
More Thermomix® basic recipes
If you are boiling eggs, you will often also need: egg salad in the Thermomix®, cooking potatoes (at the same time as eggs in the Varoma), cooking broccoli, breakfast rolls or porridge for a complete breakfast. All Thermomix® speed settings explained.