


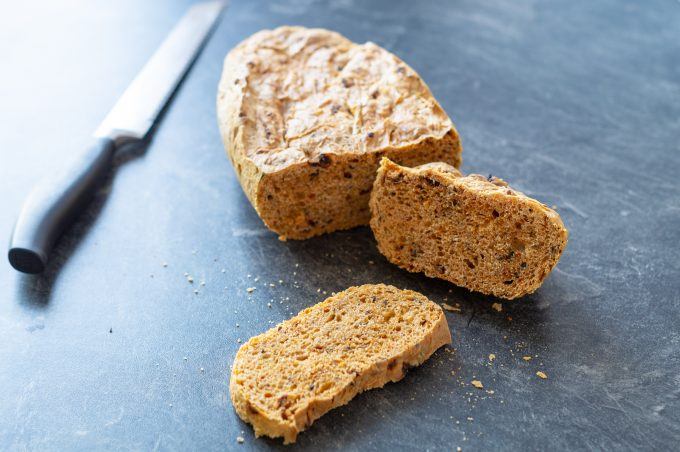
Olive and tomato bread with the Thermomix® turns out perfectly in the foldable silicone bread tin, no greasing and no flouring required. The quick route to a finished loaf: chop 50 g olives and 50 g sun-dried tomatoes for 4 seconds at speed 5, warm 1/2 cube of yeast with 200 g water for 2 minutes at 37°C at speed 2, then knead with 350 g flour and 50 g olive oil for 3 minutes on kneading mode. Leave the dough to prove for 1 hour in the closed tin and bake at 200°C fan for 40 minutes. Makes 16 slices at 113 kcal each.
We bake this Mediterranean bread directly in the platinum silicone bread tin. It goes from the mixing bowl to the oven and then folds back into the drawer afterwards. No greasing, no flouring, no sticking. For an even more Mediterranean spread, serve alongside a Focaccia with Gorgonzola cream.
Olive and Tomato Bread with the Thermomix® in the Bread Tin

Ingredients 0 / 8 ✓
- 50 g black olives (pitted)
- 50 g sun-dried tomatoes in oil drained
- 1/2 cube fresh yeast
- 200 g water
- 1 tsp salt
- 1 pinch sugar
- 50 g olive oil
- 350 g flour
Instructions 0 / 6
-
1
Chop the olives and tomatoes.
Add the olives and tomatoes to the mixing bowl, chop for 4 sec / speed 5 and set aside.
-
2
Mix the yeast dough.
Add the yeast, water, salt and sugar to the mixing bowl and warm for 2 min / 37°C / speed 2.
-
3
Knead the dough.
Add the oil, flour, olives and tomatoes to the mixing bowl and knead for 3 min / kneading mode.
-
4
Prove the dough.
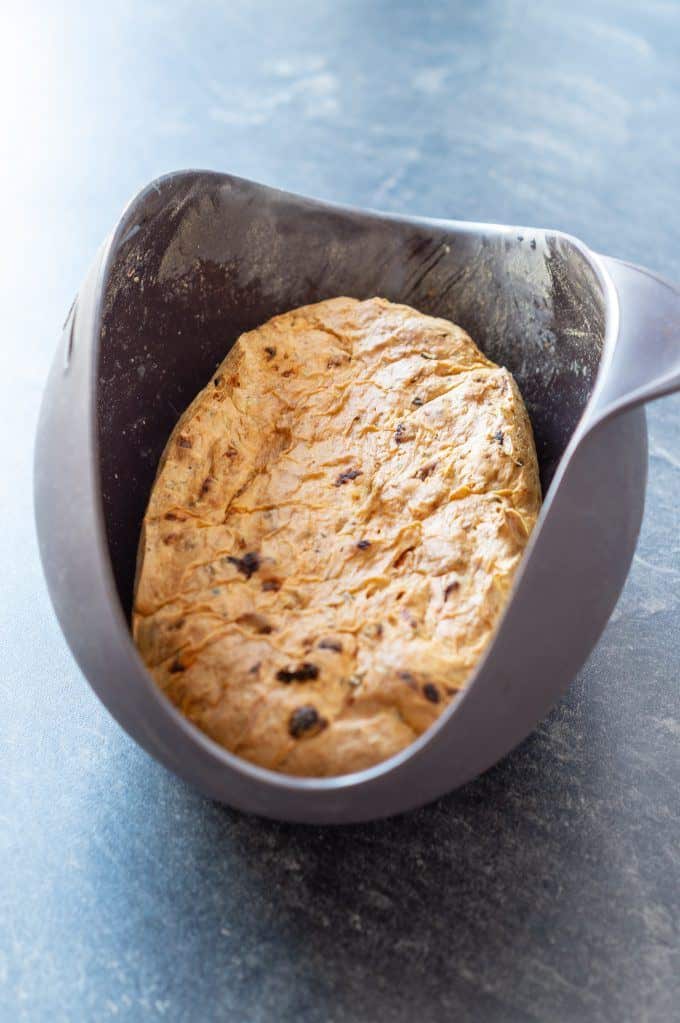
Transfer the dough into the bread tin, close and cover with a tea towel or foil. Leave to prove for 1 hour.
-
5
Preheat the oven.
Meanwhile, preheat the oven to 200°C fan.
-
6
Bake the bread.
Place the bread tin on the middle shelf of the oven and bake for 40 minutes.
Got more time? Use it and leave the dough to prove for longer. We love letting the dough prove overnight. The bread turns out even more flavourful that way!
Nutrition per serving
Why the yeast is activated at exactly 37°C
We add 1/2 cube of fresh yeast, 200 g water, 1 tsp salt and 1 pinch of sugar to the mixing bowl and warm for 2 minutes at 37°C at speed 2. This temperature is where the Thermomix® proves its worth: it holds 37°C precisely, whereas yeast in water mixed by hand easily gets too hot or too cold. Above 40°C the yeast cultures die off; below that, activation takes longer. The pinch of sugar gives the yeast immediate food and kick-starts fermentation.
One thing to note: salt and yeast go into the bowl together here, but only for 2 minutes and at a low temperature. The salt has no chance to inhibit the yeast in that short time. If you want to be safe, add the salt with the flour instead. The recipe works equally well with dried yeast: 1 sachet (7 g) instead of the half cube, added directly to the flour without pre-soaking.

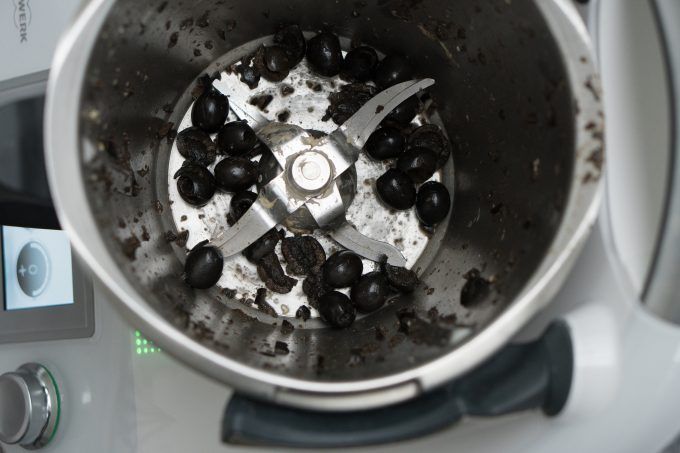
Chop the olives and tomatoes for just 4 seconds
We add the 50 g black olives (pitted) and 50 g sun-dried tomatoes in oil (drained) to the mixing bowl first and chop them for just 4 seconds at speed 5. Not a second longer. Going to speed 8 or over 10 seconds gives you a paste rather than pieces. We want visible chunks in the bread that create that Mediterranean look when you cut into the loaf. The pieces are then set aside and folded in once the dough is ready.
Sun-dried tomatoes in oil make all the difference compared to dry tomatoes from a packet. They bring more flavour and the oil carries the Mediterranean notes throughout the dough. Drain them well before chopping, otherwise the dough becomes too wet. We use black olives because they are milder than green ones. If you prefer a stronger flavour, mix in some Kalamata olives.
Knead the dough for 3 minutes on kneading mode and prove for 1 hour
After warming the yeast, we add 50 g olive oil, 350 g flour and the chopped olives and tomatoes, then knead for 3 minutes on kneading mode. Kneading mode works the gluten network evenly without heating the dough. The dough will be quite soft and that is exactly right. If you prefer a firmer crumb, add 20 g to 30 g more flour.
We then transfer the dough into the bread tin, close the lid and cover additionally with a tea towel or foil. The dough proves for at least 1 hour in a warm spot. Leaving it overnight in the fridge produces an even more flavourful loaf because the slow fermentation develops more depth. The closed tin prevents the surface from drying out.
Bake at 200°C fan for exactly 40 minutes
We preheat the oven to 200°C fan and place the closed bread tin on the middle shelf. After 40 minutes the bread is done. Fan heat distributes evenly around the silicone tin, giving the crust an even golden colour all round. If you use top and bottom heat, set 220°C and allow an extra 5 to 10 minutes, as this method circulates less evenly.
The knock test tells you whether the bread is done: we tap the bottom of the loaf, and if it sounds hollow, it is fully baked. For a crispier crust, open the tin for the last 10 minutes. For a softer result, leave it closed. After baking we leave the bread in the tin for 10 minutes, after which it comes out more easily and holds its shape.
What the silicone bread tin does better than a loaf tin or proving basket
Other olive bread recipes in the Thermomix® world use floured proving baskets or metal loaf tins. Both work, but both have drawbacks: the proving basket needs flouring before every bake or the dough sticks. The metal tin needs greasing. The platinum silicone bread tin skips both steps.
- No greasing, no flouring: The platinum silicone coating prevents sticking naturally.
- Direct path from mixing bowl to oven: Fill the dough in, close the lid, prove, bake. No turning out, no transferring.
- Dishwasher safe: For light soiling a damp cloth is enough, otherwise the tin goes straight in the dishwasher.
- Space-saving: Folded flat, it fits in any drawer and does not lose its shape.
Honestly: if you are after a rustic, very crunchy crust, a cast-iron pot gets you closer because it stores more heat. For a light, even everyday loaf with minimal washing up, the silicone tin is the simpler way.
Three variations that change the bread
With herbs: Chop 1 tsp dried rosemary or Italian mixed herbs together with the olives and tomatoes. This adds a noticeably more Mediterranean flavour, similar to many grilled bread variations.
With cheese: Fold in 50 g grated Parmesan or diced feta after kneading (5 seconds, reverse direction, speed 2) so the cheese does not get chopped up. The bread becomes more savoury and slightly denser.
As a wholemeal variation: Replace 150 g of the wheat flour with wholemeal spelt flour and add 20 g more water, as wholemeal flour absorbs more liquid. The flavour is more robust and the crumb a little denser.
Other breads that also work well in the bread tin
The bread tin works with any yeast dough made in the Thermomix®. We also bake our chocolate bread, nut and wholemeal loaf and low-carb linseed bread in it. Without the tin, French baguettes, our olive and walnut bread or a light Focaccia work just as well. The most popular breads on the site are our seeded loaf and the Thermomix® yoghurt crust bread.
How to keep the olive and tomato bread fresh and freeze it
Once fully cooled, the bread keeps in a bread bin or paper bag for 2 to 3 days. In plastic the crust goes soft, so paper or cloth is better. Because of the olive oil in the dough, this bread dries out more slowly than a plain water loaf.
To freeze, we slice the bread and freeze it in portions. It keeps for 3 months and we defrost only as much as we need. Individual slices go straight from the freezer into the toaster. A whole loaf defrosts overnight at room temperature and, briefly warmed in the oven, tastes almost freshly baked.
Goes well with: Hummus.
More Thermomix® breads: chocolate bread, nut and wholemeal loaf, seeded loaf, yoghurt crust bread.