


Sterilising only works above a certain temperature threshold, and that is exactly what the Thermomix® delivers reliably in the Varoma. Water boils in the mixing bowl at 100 °C, and the steam that rises hits the jars in the Varoma at that same temperature. Ten minutes is technically sufficient, but we use 15 minutes for safety. This leaves screw-top jars, baby bottles, dummies, feeding bottles and liqueur bottles germ-free and ready for use.
We do this every time we make jam, bottle liqueur or prepare preserves for winter. Clean jars alone are not enough. Washing-up residue and the air around us carry yeasts and mould spores that can multiply inside a filled bottle later on. A sterilised bottle, on the other hand, extends the shelf life of jam by weeks and of liqueur by months. That is exactly why this basic recipe is one of the quietest but most important steps in everyday Thermomix® cooking.
Sterilising in the Thermomix®
Ingredients 0 / 1 ✓
- 500 g water
Instructions 0 / 3
-
1
Add water and load the jars.
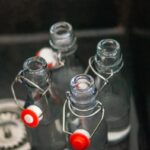
Place 500 g water in the mixing bowl and stand clean screw-top jars and their lids upside down in the Varoma.
-
2
Sterilise.
Set the Varoma in place and steam for 15 min / Varoma / speed 1.
-
3
Remove the sterilised items.
Caution, everything will be very hot! Use a clean, lint-free oven glove or kitchen cloth to transfer the jars and lids onto another clean kitchen cloth and leave to dry.
Note: Metal lids tend to rust quickly after steaming, so dry them off straight away.
Video
Why 10 minutes of steam is sufficient and 15 minutes is safe
Most bacteria die off between 70 and 80 °C. Yeasts and mould spores are trickier, but bacterial spores are the most heat-resistant of all. At 100 °C of moist heat, around 8 to 10 minutes is enough to kill even stubborn spores. Dry heat would need 30 minutes or more at higher temperatures, which is why the oven is slower. We use 15 minutes because the heat-up phase counts and glass needs time to absorb warmth before the full sterilising effect reaches the inside surface.
In practice: 500 g water in the mixing bowl, jars and lids upside down in the Varoma, then steam for 15 min / Varoma / speed 1. Once the mixing bowl is properly boiling, the steam temperature stays at a constant 100 °C. Speed 1 is perfectly adequate because steam rises on its own. A higher speed would only splash water unnecessarily without speeding anything up.
Oven, dishwasher, microwave: what actually makes things germ-free
There are several methods recommended online. We have tried them all and keep coming back to the Varoma for good reasons.
Oven at 120 °C for 15 minutes. It works, but it is dry heat. With dry heat, spores take longer to die off, and the oven uses noticeably more electricity than the Thermomix® with 500 g of water. Metal lids and rubber seals can also become hard or brittle in the oven. If you need 30 jars at once, the oven is still worth it, but for 4 to 8 jars the Varoma remains the faster choice.
Dishwasher at 70 °C. Most dishwashers reach between 65 and 75 °C on a hot programme, and some newer models reach 85 °C on a hygiene programme. That kills most bacteria, but not all spores. The dishwasher is great for cleaning before preserving, but it is not enough as a sterilisation method on its own. The process should be: wash first, then sterilise in the Varoma if the contents need to keep for a long time.
Microwave. The method of adding a little water to the jar and running it on full power for 2 minutes circulates widely online, but it is unreliable. Microwaves heat unevenly, the steam does not build up for long enough, and the lids cannot go in. It is not suitable for genuine sterilisation.
Boiling in a pot. Classic and reliable, but awkward. You need a large pot of water, must submerge the jars completely and treat the lids separately. In the Thermomix® Varoma, the jars stand upside down so the steam reaches every inner surface, and the water below can simultaneously cook whatever you need next, such as the jam itself.
What to watch out for with baby bottles and dummies
We sterilise baby bottles, teats and dummies by the same principle, but with two adjustments. First, the bottles go into the Varoma upside down without the screw ring, while the teat and screw ring lie separately on the Varoma tray so the steam really reaches everywhere. Second, 10 minutes is enough for basic hygiene sterilisation, but we extend to 15 minutes here too, because milk residue is especially rich in nutrients for bacteria.
Important: clean thoroughly with a bottle brush beforehand and remove all traces of milk. Sterilisation does not replace cleaning, it complements it. Dummies with latex teats become brittle more quickly in hot steam than silicone teats, so we check them monthly for cracks and replace them sooner. With silicone teats there is no such restriction.
After sterilising, do not wipe items with a tea towel or fresh bacteria will land straight on germ-free surfaces. We place everything on a clean, fresh cloth and leave it to dry in the open air. Using items immediately is ideal, otherwise within 24 hours. After that the items are no longer considered sterile.
Metal lids and screw rings: the rust problem
Anyone who has sterilised jam jars before will know it: metal lids develop rust spots around the edge after a short time. This is caused by the moist heat and the coating on the lids. We dry the lids immediately after removing them with a clean kitchen cloth rather than leaving them to air-dry. This reliably prevents rust, and the brief contact with the cloth is acceptable because we place the lids straight onto the hot, filled jars straight away, where the vacuum restores sterility.
With twist-off lids (standard jam jars) it is worth rinsing the lid with a few drops of boiling water just before sealing. This helps the vacuum form cleanly as the hot jam contracts and the jar is turned upside down.
Sterile bottles for liqueur and syrup
For liqueur, sterilisation matters even more than for jam, because the sugar content is often lower and an alcohol level below 35 per cent does not cover everything on its own. We always sterilise liqueur bottles in the Varoma before filling them. The same applies to syrups: without sterile bottles the shelf life is often only a few weeks, but with sterile bottles most syrups keep for several months stored in a cool, dark place.
In practice, we use this sterilisation step regularly for our strawberry jam with the Thermomix®, tangerine marmalade, sugar-free conserve and homemade bath salts with the Thermomix®. Liqueurs and syrups benefit directly too, as the bottles often sit in the cupboard for months before being opened.
Jar size and fill capacity in the Varoma
Depending on jar size, the Varoma holds between 4 and 8 screw-top jars at once. We sterilise small 200 ml jam jars eight at a time, and larger 500 ml liqueur bottles one or two at a time. It is important that the jars do not touch the Varoma lid, otherwise condensation runs straight inside. A little space allows steam to circulate between the jars and ensures the sterilisation is genuinely even.
The 500 g of water in the mixing bowl is enough for the full 15 minutes. If you are planning several rounds in a row, top up the water or at least check that enough remains after the first round. Running the mixing bowl dry damages it and interrupts the sterilisation.
You might also find this useful: Baking release spray with the Thermomix®.
If you want to go deeper into preserving: our jam classics such as strawberry jam with Cointreau and tangerine marmalade both use exactly this sterilisation step. For long-lasting homemade liqueur gifts, sterile bottles are simply a must.