


A good farmhouse bread depends on the dough staying consistently warm while it proves. That is exactly why we use the mixing bowl as a proving chamber: 37°C, reverse direction, speed 1, and the bowl holds the temperature precisely while the yeast gets to work. No oven tricks, no heat mat, no worrying about draughts.
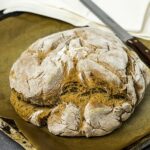
We make this farmhouse bread with 300 g strong white wheat flour (Type 550) and 400 g dark rye flour (Type 1150), plus 100 g buttermilk and a teaspoon of freshly ground caraway. That ratio gives a robust, slightly tangy crumb that works just as well alongside soup as it does with a slice of cheese or a glass of red wine. We have calibrated this recipe over years in our own oven and have gathered here all the tips that make the difference between a flat, dense disc and a tall, rustic loaf.
Rustic Farmhouse Bread with the Thermomix®
Ingredients 0 / 10 ✓
- 1 tsp caraway seeds
- 1 cube fresh yeast
- 400 g water
- 300 g strong white wheat flour (Type 550)
- 400 g dark rye flour (Type 1150)
- 100 g buttermilk
- 2 tsp salt
- 2 tsp bread spice mix
- 1 tsp honey
- flour for the work surface and for dusting
Instructions 0 / 7
-
1
Grind the caraway seeds.
Add the caraway seeds to the mixing bowl and grind for 8 seconds / speed 10.
-
2
Warm the yeast.
Crumble the yeast into the mixing bowl. Add the water and warm for 3 minutes / 37°C / speed 1.
-
3
Knead the dough.
Add the wheat flour, rye flour, buttermilk, salt, bread spice mix and honey, then knead for 5 minutes / kneading mode.
-
4
Prove the dough.
Leave the dough in the mixing bowl to prove for 30 minutes in a warm place.
-
5
Shape the loaf.
Line a baking tray with baking paper. Turn the dough out onto a well-floured work surface, shape into a loaf, place on the prepared tray, cover and leave to prove for a further 1 hour.
-
6
Preheat the oven.
Preheat the oven to 250°C (fan 230°C, gas mark 6). Fill a heatproof dish or roasting tin with water and place it on the base of the oven.
-
7
Bake.
Bake the bread for 15 minutes, then reduce the temperature to 170°C (fan 150°C, gas mark 2) and continue to bake for approximately 60 minutes.
Tip: Top your favourite loaf with chopped nuts, sunflower seeds and pumpkin seeds for extra texture!
Video
Nutrition per serving
Why rye needs 5 minutes on kneading mode
Rye flour contains less gluten than wheat flour but more mucilaginous compounds (pentosans). These bind water and need to be properly activated, otherwise the dough falls apart during baking. That is why we knead for 5 minutes on kneading mode, considerably longer than for a plain white loaf. This is not excessive; it is essential. Anyone who under-kneads will end up with a loaf that stays damp inside and does not rise properly.
We add the 400 g of water to the yeast deliberately and warm it for 3 minutes at 37°C. Yeast becomes active from 30°C and dies above 45°C. The Thermomix® hits 37°C exactly, unlike a microwave or kettle where we are always testing the temperature with a finger. We add the honey together with the flour, not with the yeast, because sugar draws too much moisture to the surface if added too early.
The mixing bowl as a proving chamber
After kneading we leave the dough to prove directly in the mixing bowl for 30 minutes in a warm place. We simply set the mixing bowl on the work surface, put the lid on and drape a tea towel over it. Anyone with a cold kitchen can place the bowl back on the machine and programme 37°C, reverse direction, speed 1 for the proving time. The constant temperature is the reason the dough reliably doubles in volume. In a bowl on a radiator we often lose heat at the edges; in the mixing bowl we do not.
After the 30 minutes we shape a long loaf on a generously floured work surface. The dough is sticky, which is normal for rye. We flour our hands well, press out the air and work the dough into a rustic shape. Onto the baking tray lined with baking paper, a tea towel on top, and leave to prove for another 60 minutes. Anyone with a proving basket can rest the dough there instead, which gives the loaf the classic flour pattern on the surface.
Steam for a rustic crust
The key step for a proper farmhouse crust happens in the first 10 minutes in the oven. We preheat to 250°C and place a roasting tin of water on the oven floor. When the bread goes into the hot oven, the water evaporates immediately. This steam keeps the bread surface moist, the starch gelatinises, and the crust develops that characteristic shine and crunch. Without water in the oven we get a dull, floury surface.
After 15 minutes we reduce to 170°C and bake for a further 60 minutes. The high initial temperature provides oven spring (the bread rises one last time), while the lower temperature cooks the loaf through without burning the outside. Tap test at the end: knock on the base, and if it sounds hollow the bread is done. If it sounds dull, give it 5 to 10 more minutes.
What often goes wrong with farmhouse bread
The loaf stays flat and does not rise
Usually the yeast was either too old or the water too hot. A fresh yeast cube keeps for only about 12 days in the fridge. If you have older yeast, add half a cube extra. When warming, stick strictly to 37°C, not 40, not 45. Our solution: Press the yeast cube lightly before crumbling. If it crumbles cleanly and smells fresh, it is good. If it smears or smells musty, throw it away.
The crumb is damp and gummy inside
Rye bread needs longer in the oven than you might expect. If the tap test sounds dull, there is still residual moisture inside. Our solution: Bake for 10 more minutes, covering loosely with foil if necessary to stop the crust getting too dark. And always cool completely on a wire rack, for at least 2 hours. Cutting while warm compresses the crumb and gives a gummy impression even if the bread is fully baked through.
The crust turns tough rather than crisp
If the steam is missing in the first 10 minutes, the surface turns leathery instead of crisp. Some people forget the water dish; others only add it once the bread is half-baked. Our solution: Put the water dish in while the oven is preheating, so there is enough steam the moment the bread goes in. Then remove the dish after 10 minutes so the bread finishes baking in dry heat.
Variations we make regularly
With sunflower seeds: Knead 80 g of sunflower seeds into the dough, then press a further 40 g onto the shaped loaf. The seeds on top toast during baking and add a lovely flavour.
With a sourdough element: Add 100 g of active sourdough starter and reduce the yeast to half a cube. The crumb becomes more pronounced and the bread keeps for two days longer.
More robustly spiced: Use 4 tsp instead of 2 tsp of bread spice mix, and grind an extra teaspoon of fennel seeds with the caraway. The flavour is more savoury and pairs well with a strong cheese.
Spreads, soups and hearty cheese boards
We love fresh farmhouse bread with a robust spread or a bowl of soup. Our carrot spread with the Thermomix® and ajvar brings sweetness and heat at the same time, while a cheese spread made from aged mountain cheese turns a single slice into a full meal. On cold evenings we serve the bread with tomato soup or dip it in olive oil. If you would like to bake more breads, we also have a spelt baguette and a flatbread made with the Thermomix®.
Fresh for 5 days, frozen for 3 months
We store the bread in a linen bread bag or a clay pot, never in plastic. In plastic the crust goes soft within hours and the bread begins to mould after 2 days. In a linen bag it stays fresh for 4 to 5 days. For longer storage, slice the whole loaf, freeze the slices in portions and toast them straight from the freezer. The bread tastes as good as freshly baked even after 2 weeks. Freezing a whole loaf works too, but it takes 4 hours to thaw at room temperature.
Yeast instead of sourdough: why we go this route
Most farmhouse bread recipes for the Thermomix® call for a rye sourdough starter with 8 hours of feeding, four folding cycles and a two-day prove. Anyone who already has a sourdough starter in the fridge will do well with that approach. We deliberately build our farmhouse bread with yeast and buttermilk: in just under two hours, including baking time, a loaf is on the board, and the buttermilk brings a slightly tangy note that normally only sourdough provides. The 400 g of rye still delivers a rustic crumb, and the 37-degree mixing bowl trick replaces the long fermentation phase that throws many people off their weekly routine.
Goes well with: Butter and cheese.
You might also like: Mini wheat baguettes with the Thermomix®.
Find more bread and baking recipes in our overview. Also try our sesame and chilli bread sticks with the Thermomix® for a snack evening, or our plaited sweet bread for Sunday brunch.